Navigating Toronto Transit Like a Local
- Sancia Rebello
- Dec 3, 2024
- 4 min read

Updated: Dec 10, 2024
Hello Harrys! If you’ve just landed in Canada or are planning to move here soon, this blog is tailor-made for you. Even if you’ve been here for a while, trust me, Toronto's public transit system (aka the TTC) always has surprises in store. Let's dive into the essentials of navigating the TTC's buses and subways, so you can commute like a local (or at least pretend to).
TTC Buses: Your New Best Friend
Step 1: Get a PRESTO Card

To use TTC buses, you’ll need a PRESTO card. Here's how to get started:
Where to Get It: Visit any Toronto Public Library for a free card or Shoppers Drug Mart to grab one.
Loading Your Card: Top it up with funds. If you're traveling frequently, consider a monthly pass for approximately $129. It’s a lifesaver if your daily taps exceed the pass cost (each tap is valid for two hours).
💡 Pro Tip: Link your PRESTO card to the PRESTO app or your phone’s wallet (Apple Pay/Google Wallet). Lost cards are easier to replace this way. Learn from my $50 oopsie moment when I didn’t link my first card.
Step 2: Catching the Right Bus
Use Google Maps to find your route and bus number.
At the stop, look for poles listing the bus numbers that should look like this:

Express buses (starting with "9") only stop at major intersections. Night buses (starting with "3") run after regular hours.
💡 If you see "Detour on Route" or "Short Turn" signs, double-check with the driver to ensure it’ll take you where you need to go.
Step 3: Boarding and Bus Etiquette
Boarding: Tap your PRESTO card at the machine on the right as you enter. If you're entering from a station, no need to tap.

Seating: Blue seats are reserved for those who need them—offer your seat when necessary. If you’re standing, move to the back. Nobody likes a door-blocking Karen.
Step 4: Requesting a Stop
Listen for announcements or watch the screen for your stop.
When your stop is approaching, press the red button or pull the yellow wire.

If you’re getting off at a station, no need to request a stop—easy peasy!
TTC Subway: Toronto's Lifeline
Toronto’s subway system is the heartbeat of the city’s public transit, making it one of the fastest and most reliable ways to get around. The TTC subway currently has three main lines, each with its own unique route and direction:
Line 1 (Yellow Line): Runs in a U-shape, connecting the north end of the city (Vaughan) to Union Station and looping back up through North York. It's the busiest and longest line.
Line 2 (Green Line): Travels east to west, linking key neighborhoods like Scarborough, Downtown Toronto, and Etobicoke.
Line 4 (Sheppard Line): A shorter line running east from Sheppard-Yonge Station to Don Mills, ideal for commuters in North York.
Each line has clear signage, and stations are designed to help you navigate with ease (most of the time!). Now let’s dive into how to make your first subway experience a smooth ride.

Step 1: Entering the Station
Most people access stations via buses, but if you're on foot:
Enter only through designated doors or underground pathways.
Avoid bus-only entry points—you could face a $500 fine.
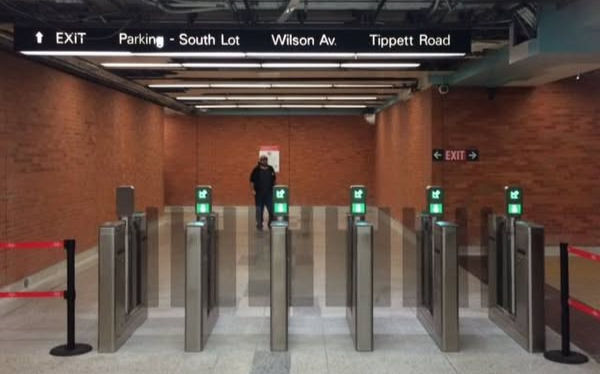
Step 2: Tapping In
Tap your PRESTO card at the barriers to enter.
Step 3: Finding Your Platform
Toronto's subway lines are simple:
Line 1: Northbound/Southbound
Line 2: Eastbound/Westbound
Line 4: Eastbound/Westbound
Check the map to determine your direction and confirm with a TTC staff member if unsure.
💡 PRO Tip: Some stations have unified platforms, while others have split platforms. Double-check you’re on the right one!

Step 4: The Wait
Screens display train arrival times.
Don’t forget to connect to the station's Wi-Fi—it’s free!
Stay near the Designated Waiting Area (DWA) for monitored safety zones.

Step 5: Riding the Train
On Lines 1 and 4, maps with lights indicate your location.

On-Line 2, pay extra attention to announcements to avoid missing your stop (they’re tricky at first but become second nature).
Once you’ve arrived, navigate back to the street, and you’re good to go! Check out my blogs for detailed navigation of the station of your choice. Yes I have covered them all!
💡 PRO Tip: The TTC might feel confusing at first, but soon, you'll be commuting like a pro. And hey, if all else fails, just ask—most Torontonians are happy to help. Welcome to the Transit Tango!
That’s all for now, fellow Harrys! I hope this guide helps you feel more confident as you navigate life in Toronto. Don’t forget to check out my other blogs for more tips, tricks, and relatable stories about being an international student in this amazing city. If you wan't more detailed information you can always check out TTC's page https://www.ttc.ca/
Do follow me on Instagram for quick updates, behind-the-scenes moments, and a few laughs along the way. Let’s conquer Toronto together, one adventure at a time!

Comments